|
BMW Diesel Engine Hot Starting Fix Cranking the engine for ages before it starts when hot!
|
Hot Fix Timer Unit |
|
|
BMW 6 Cylinder Diesel Engine (M51) Hot Fix. This 'hot-fix timer relay unit' was originally designed for use on the Range Rover P38 Diesel which is fitted with the BMW 6 cylinder diesel engine. If you have purchased this fix for a Range Rover 2.5 DT or DSE (1994 to 2001) follow the instructions below. If you have purchased this fix for any other vehicle it is still worth reading the Range Rover installation instructions and then adapt them for use on your vehicle. I have included a couple of pictures showing the location of the relevant parts in the BMW 3 & 5 series at the bottom of this page.
Carefully follow the instructions below, if there is
anything you are not sure about please do not hesitate to contact us for help
& advice. sille@btconnect.com
or Tel: 07710 359319 First
make sure you have your EKA code, this is normally a 4 digit code found on your
‘security card’. It allows you emergency access to the vehicle if your
remote key fob will not work after the battery has been disconnected. Details on
how to use the EKA code can be found in your Range Rover users manual in the
lock & alarm section. Disconnect
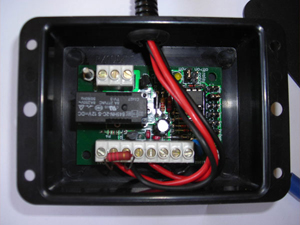
the negative terminal of the vehicles battery. Attach the new ‘timer relay housing’ in a suitable position as shown in picture [A], you will need to drill two small holes and then used the screws supplied.
|
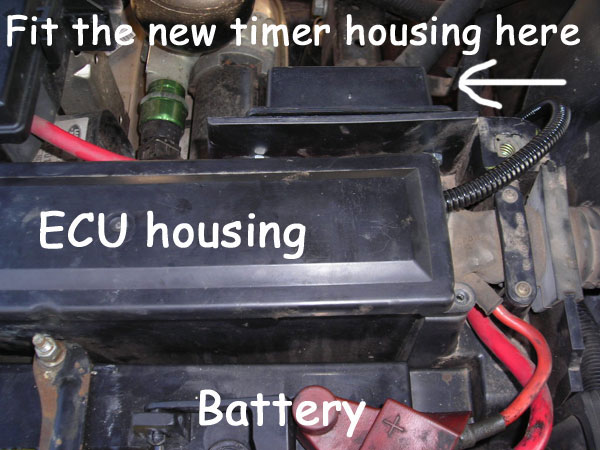
PICTURE: A |
|
|
Now
remove the vehicles ECU housing lid, this is attached by two small screws. The
location of the ECU housing is shown in Picture [A] above. You
are now looking for 3 wires, a grey/blue
trace wire running into the main ECU plug, a red/white wire which is connected to a relay which is just
beside/below the ECU and a bunch of black
earth wire. You
may find it easier to lift the ECU out of the housing however, if you do make
sure it does not touch any of the battery terminals. Grey/blue
trace wire, Picture [B] this is the temperature sender wire. You need to cut
this wire and attach the two crimps supplied (one male & one female and it
does not matter which way round they go) these are then plugged into the
corresponding connections of the new timer relay housing. |

PICTURE: B |
|
|
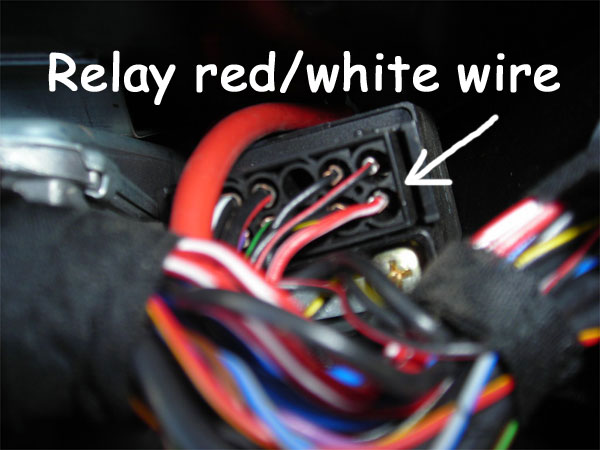
Red/white
relay wire, Picture [C] this is a 12 volt supply which is switched by the
ignition. Using one of the joining connectors supplied to attach this red/white
wire to the brown wire (labeled red/white relay) on the new timer relay
housing. Black
earth wire, Picture [B] you should notice a bunch of black earth wires, just
connect the blue wire (labeled black earth) on the new timer relay housing to
any of these black earth wires using the other joining connector supplied. That’s
it, put the lid back on the ECU housing, re-connect the battery and your all
done. If you find your remote key fob no longer works due to the vehicle battery being disconnected, follow the re-synchronisation procedure below.
|
PICTURE: C |
|
|
Key
Fob Resynchronisation On
vehicles up to 1997,
resynchronisation
is achieved by locking or unlocking the driver’s door using the vehicle key
and then with the key still in the door immediately pressing the button on the
remote handset. The
BeCM
monitors the condition of the driver’s door CDL switch to initiate the
resynchronisation. On vehicles from 1997, friendly resynchronization was introduced on vehicles with passive immobilisation. A remote handset that is not synchronised to the BeCM will automatically be resynchronised when the key is inserted in the ignition without using the vehicle key or Emergency Key Access (EKA) procedure. The resynchronisation uses a pick-up coil in the remote handset and a passive coil located around the ignition barrel. The passive coil provides a signal for the remote handset to transmit an unlock signal to remobilise the vehicle. ‘Window
not set’ message displayed on the dash after the battery has been disconnected The
windows & the sunroof on the Range Rover have a ‘one touch’ operation
programmed into the ECU. When
the vehicles battery is disconnected, the ECU losers it’s settings and
displays the ‘WINDOW NOT SET’ & ‘SUNROOF NOT SET’ message on
the dash. These need to be re-programmed once the battery has been re-connected,
to do this follow the procedure below. Driver
side window: 1
Make
sure the window is fully closed. 2
Open the window
(keeping your finger on the down button while the window travels downwards) 3
As
soon as the window reaches the lowest position, immediately move your finger to
the up button, keeping your finger on the up button while the window rises,
watch the display message on the dash. It will be displaying ‘WINDOW NOT
SET’, Keep your finger on the up button for about 5 to 10 seconds after
the window is fully closed. The message on the dash should now change to
‘WINDOW SET’ . If
it does not work first time, try and try again. You need to fully open and then
fully close the window in one smooth operation for this to work. You now need to repeat this procedure on each of the other windows. If you have a sunroof you need to do a similar operation on that, fully open, then fully close, once closed, fully tilt open and then fully closed again until ‘SUNROOF SET’ is displayed on the dash. The red dot below shows the location of the engine control module (ECM)
The picture below shows the location of the glow plug heater relay.
|
||